Wednesday, January 26, 2011

Whole Grain Pasta with Spinach, Mushrooms, Shallots, Pancetta and Parmesan

For the second week in a row I was blessed with some really, I mean REALLY beautiful spinach in my CSA shipment from Harvest2U. Since it is winter, and not everyone is having the springlike weather that we're enjoying, I decided to go for a hot dish using my spinach instead of a salad.

This recipe is South Beach (phase 2 and 3) friendly and can be made gluten free (GF) by replacing the pasta I've used with GF pasta.

Whole Grain Pasta with Spinach, Mushrooms, Shallots, Pancetta and Parmesan

1/2 box of organic, whole grain pasta cooked to al dente
2oz pancetta
2T olive oil
1 large shallot, sliced
2 cloves garlic, diced
2c sliced baby bella mushrooms
2T finely chopped flat leaf (Italian) parsley
4-6 cups fresh raw spinach, stems removed
1/2c freshly grated parmesan cheese
salt and pepper to taste

In a large pot boil water and cook past to al dente. Mine was ready at 7 minutes. Drain, and set aside.

In a large skillet, coated with cooking spray, cook pancetta until crisp. Remove from skillet and let drain on a paper or kitchen towel. Set aside.


In that same skillet, add olive oil, shallots, garlic and parsley. Saute until shallots become soft (this won't take long at all).


Add the mushrooms to the skillet and saute again.


Once the mushrooms start to soften and change color, add your spinach into the skillet and cook until wilted. I prefer my spinach a little more undercooked and closer to it's raw state, but please wilt yours as much as you like.


Once the spinach is wilted, add salt and pepper to taste and toss together with pasta. At this point you'll add 1/3 of the parmesan cheese and toss again. Repeat that process. 

Then to plate this meal, twist the pasta into a little nest, if desired, top with a little more parmesan cheese and crumbled pancetta. This is such a delicious dish!


Saturday, January 22, 2011

Chicken, Green Chile and Cheese Bake


My inspiration for this dish came from a stuffed chicken breast recipe that someone told me about. I thought I'd change it up a bit to make it more kid friendly.  I also wanted a casserole type dish that I could easily eat on it's own with a salad or vegetables, or my guests could enjoy in a tortilla or pita pocket.

This recipe is South Beach Diet friendly for all Phases.

Chicken, Green Chile and Cheese Bake

2 whole chicken breasts
1/2 onion, chopped
1T olive oil
1/2 red pepper, chopped
2 cloves garlic, minced
1/2c low fat sour cream
1/2c non fat plain greek yogurt
1 (4oz) can diced green chiles
1 1/2 low fat shredded cheddar cheese
salt
pepper
smoked paprika
2t cumin

Preheat oven to 350*.
Season chicken breasts with salt, pepper and smoked paprika. Spray frying pan with non-stick cooking spray and cook chicken breasts stove top until done. Remove chicken from the pans and set aside to rest for about 10 minutes.


While chicken is resting, chop onion, red pepper and garlic. Add olive oil to the pan that you cooked the chicken in and saute onion, red, pepper and garlic.


In a medium mixing bowl add sour cream, yogurt, green chiles (with juices) and cumin. Mix well. Add sauteed vegetables to this mix along with 1/2 of the cheese. Mix well.


Cut chicken into bite sized pieces and place in 8x8 or 9x9 baking dish that has been prepared with non-stick cooking spray. add the yogurt/sour cream mixture to the chicken and mix well. Bake in 350* oven for 30 minutes or until chicken is bubbly and cheese begins to brown.


I forgot to take a photo once the chicken was plated since we had company. My husband and I had our chicken in a low carb pita pocket (half of a round each), topped with lettuce, tomato, onion and cilantro. Our guests and our kids ate theirs in four tortillas. This could very well be eaten as is, without any sort of bread if you are on Phase 1 of the South Beach Diet.


I also thought I'd stick in a photo of this beautiful salad that was our side dish this evening. I LOVE the way the red leaf lettuce looks with the colorful vegetables. The beautiful red leaf lettuce, the amazingly delicious carrots, and the lovely radishes came in my weekly CSA box from Harvest2U.
Seriously, if you are in the Temecula/Murrieta area I highly recommend this CSA.

Wednesday, January 19, 2011

Burgers and Fries - South Beach Style


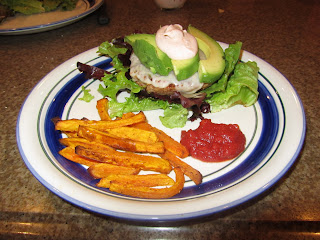
Yeah, I said it. Tonight I made burgers and fries, South Beach Diet style. They weren't just good, they were delicious! These aren't your average burgers and fries though, no sir. The burgers are pinto bean burgers. I actually had full intentions on making black bean burgers, but alas, I was out of black beans. That in itself is a mind boggler, I always have black beans. The fries were butternut squash fries that I made with the lovely butternut squash that arrived in my CSA box from Harvest2U this week.


We'll start with the "fries" first since they take the longest.

Baked Butternut Squash Fries (South Beach Phase 2 and 3)

1 large butternut squash (peeled, seeds removed)
2T olive oil
2t kosher salt
1/2t garlic powder
1/2t onion powder
1/4t pepper

Slice the butternut squash into french fry shape. Next time I'll use my Pampered Chef crinkle cutter, just for the classic crinkle cut fry effect.


Toss the squash in the olive oil. Sprinkle with half of the spices, toss again. Sprinkle with the last half of the spices and toss again. Spread evenly on a cookie sheet that has been coated with non-stick spray. Bake at 425 for 20 minutes, remove pan, turn fries and bake another 20 minutes.
Serve with sugar free ketchup, I made my own in about 5 minutes.

These fries are amazingly good. They are similar in fashion to sweet potato fries, but I think I like these better. Your kids WILL eat these!

Pinto Bean Burger

1 can (14oz) rinsed and drained pinto beans
2/3 cup oats (not instant)
1/2c chopped onion
1/2c chopped red bell pepper
1/4c chopped carrot
2 cloves garlic, chopped
1t chipotle seasoning
1/2t smoked paprika
1/2t cumin
1/3c egg substitute or 2 eggs, beaten
olive oil
4 slices of low fat cheese

Dressing
1/3c non fat, plain greek yogurt
1-3t of hot sauce of your choice
Mix well.


Rinse and drain pinto beans. Leave in colander to continue to drain. Set aside.


In a food processor (I actually used the chopper attachment of my Cuisinart Smart Stick emersion blender) pulse oats until they become a powder that is slightly more coarse than flour. Empty oats into large mixing bowl.


Back into the food processor add onion, bell pepper, carrot and garlic and pulse until minced.


Place pinto beans in a medium sized bowl and mash with a fork. Once they are well mashed, add the onion/pepper/carrot/garlic mixture and blend well. Add spices and mix. Then add egg substitute and mix again. Once this is well mixed, add 1/3 of this to the oats and mix with hands or wooden spoon, add another 1/3 and mix again and then add the final 1/3 and mix.


Once all of the ingredients are well mixed, divide into 4 equal parts and form patties similar to hamburgers.


Heat 2T oil in a large non-stick skillet. When the skillet is hot, add two of the burgers. Cook approximately 4 minutes on each side. About 2 minutes before burgers are ready to come out of the pan add a slice of low fat cheese, I used low fat pepper jack.

If you are on Pase 3 of the South Beach diet, feel free to put this into a whole grain pita. If not, serve it like I did, on a bed of lettuce. On top of the cheese covered patty I placed 1/4 of a sliced avocado and dressing.


I do believe that this is by far my favorite South Beach Diet creation yet!

Sunday, January 16, 2011

I'm Strong To The Finish, 'Cause I Eats Me Spinach


Spinach needs no introduction. We've all eaten it whether it be sauteed, creamed, in a dip, in am omelette or raw. Since we've had some beautiful spring-like warm weather this weekend, I decided to go with spinach in it's raw and natural form. This is actually my favorite way to eat spinach.

Spinach is a nutrient rich food. When eaten raw or steamed it retains it's nutrients best. It's high in antioxidants and packed full of vitamins, I mean seriously, packed.


Spinach Salad with Pancetta and Goat Cheese

8c fresh, washed, loosely packed spinach leaves
2oz goat cheese, chopped (goat cheese is easier to chop if you put it into the freezer for a few minutes first)
1.5 ounces pancetta (I used half of a 3oz pack of sliced pancetta from the market)
3T diced red onion
1/4c chopped walnuts
Balsamic Vinaigrette (see Beet post for recipe)

Cook pancetta until crisp, remove from heat and set aside on a paper towel.

Once your spinach is washed, pat dry with a clean kitchen towel. Place spinach in a salad bowl or divide between two dinner plates. Sprinkle salad with goat cheese, onion and walnuts.
Crush pancetta and sprinkle on top of salad.
Dress with Balsamic Vinaigrette.


This salad is amazing and refreshing and so very simple. It serves two for a main course or four as a side dish.

How Do You Like Them Apples?


I've just experienced one of the most amazing weekends. It was relaxing and productive and totally satisfying. I spent lots of time with my family and in the kitchen.

My boys have this fascination with apple jelly. Not just any apple jelly, but their mom's homemade apple jelly. Since I was fresh out of the goods, and have been for a week, I decided it was time to get the canning equipment out and get to work. I had an apple-licious afternoon.

I'm just going to warn the South Beach dieters now that this apple jelly recipe is NOT South Beach Diet friendly. Have no fear, the forbidden jelly recipe will be followed by an apple dessert recipe that I created this weekend and it is South Beach Diet (Phase 2 and 3) friendly. My brother-in-law, who has celiac's disease was here for dinner so my dessert is also gluten free.


Mel's (Low Sugar) Caramel Apple Pie Jelly

8c peeled, cored and diced apples (I used Jonagolds)
2/3c apple cider
1T butter
1 package of fruit pectin (I used Ball brand)
3c Splenda
1 1/2c packed brown sugar
1t cinnamon
1/2t nutmeg

In a large pot mix apples, cider and butter and cook on medium heat until apples soften.
Add the package of pectin and stir well. Stir constantly until it comes to a boil.
When apples come to a boil, stir in Splenda, sugar and spices. Bring the mixture back to a boil and cook one minute. Remove from heat.
Pour into sterile, hot canning jars and leave 1/4 inch headspace. Securely fasten lid and ring and process in a water bath for 10 minutes.
Makes 7-8 half pint jars full.


Mel's South Beach Apple Crisp
(South Beach Phases 2 and 3 and Gluten Free)

8c peeled, cored and cubed apples (I used Jonagold again)
Zest and juice of one lemon
1 1/4t cinnamon, divided
1/2t nutmeg
3/4c plus 1T Splenda, divided
1c oats (not instant)
1T margarine, cubed
1T olive oil
1/4c pecans

Preheat oven to 325.
In a large mixing bowl combine apples, lemon juice, zest, 1t cinnamon, nutmeg and 3/4c Splenda. Mix well.
Topping:
In food processor, combine oats, 1/4t cinnamon, 1T Splenda, 1T margarine, olive oil and pecans. Pulse until mixture forms a course meal.
Place apples into 8x8 (or similar) baking dish that has been sprayed with cooking spray. Sprinkle topping over apples and bake until the apples are soft, approximately 30 minutes.

Let the apple crisp cool down, but not all the way. It's best when it's still warm. It was delicious and it disappeared VERY quickly.


Friday, January 14, 2011

Meet the Beets

I was gifted with golden beets in last week's Harvest2U shipment and the more traditional red beets in this week's shipment. So, what did I do? I got to work trying to figure out how to use these beauties.

OK, be honest here, beets are not the most popular vegetable on the planet. I didn't care for them until a little over a year ago when I was served beets as part of an amuse course at a very fine restaurant. Until then, I never knew that they could be anything other than a gelatinous, over pickled red item on an all you can eat salad bar. I had no idea just how good beets actually could be.

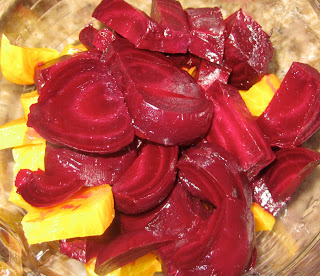
Since I had never prepared beets before, I set out to research beets and found out that they are ancient, I mean, they have pretty much been around since before Christ. They are also loaded with antioxidants, folic acid, calcium and potassium. The other thing I found out was that for those of you on Phase 1 of The South Beach Diet, they are not yet allowed. They are high on the glycemic index and should be reserved for Phase 3 of the diet or a once in a while treat for Phase 2. I also enlisted help from an acquaintance I've made in another online community. She hasn't given me permission to use her name so we'll just refer to her as "E" for the time being. She was kind enough to give me some preparation ideas as well as roasting instructions. Once I figured out that I was going to roast them, the rest was easy. I had also been gifted a beautiful bounty of arugula in my CSA box. Yep, my mind was made up.

Arugula Salad with Balsamic Beets and Goat Cheese
South Beach Phase 3 (2 on occasion) and gluten free (GF)

Roasting your beets: (Courtesy of b)

Wash (scrub) your beets
Remove the stems, the tops and the bottom of the roots
Rub a little bit of oil on your beets
Tightly wrap each beet in foil
Bake on a sheet pan in a 375 degree oven until a knife easily pierces them. Mine took about 45 minutes.
Remove beets from oven and let cool in foil wrap
While they are still warm, unwrap your beets and peel them. The peels will come of very easily. (I'm also grateful for my friend's reminder to wear an apron, beets are very messy and they stain)
This is where I stopped on Wednesday night. I then put them in zipper bags and put them in the fridge until tomorrow, but you could certainly continue with preparation.

Continuing on, slice cut your beets into bite sized pieces.


Balsamic Dressing:
Start with a wide mouthed bowl. It makes whisking much easier.
To the bowl add
1 clove minced garlic
1 minced shallot

1/2c balsamic vingar (for GF make sure there are no colors or additives that might contain gluten)
whisk together
add 1/2c olive oil and whisk
1t dijon mustard (Grey Poupon is GF)
fresh ground pepper
whisk again and continue to whisk until the dressing begins to emulsify. It will thicken a bit and change color and texture.
Now, add this lovely dressing to the bowl of beautiful beets and let marinate in the refrigerator for a couple of hours if you have it. If not, no biggie, you can use it right away.

When you're ready to assemble the salad you'll need the following in addition to the beautiful beets we've been preparing.
1 large bunch of arugula
3 oz of goat cheese (more if you like it)
1/4c minced red onion
a handful of slivered almonds

Starting with the arugula, wash it and remove the lower parts of the stems. Pat dry with a clean kitchen towel. Plate the arugula and add approximately 1/2 cup of beet mixture to the top of the arugula. Add desired amount of goat cheese, sprinkle with red onion and slivered almonds. And, that's it!

Here she is, she's a beauty! Enjoy!


Wednesday, January 12, 2011

Learning More About What A Local Garden Grows In Winter

Tatsoi

What on earth is tatsoi? That's what I said when I opened my box of produce from Harvest2U last Wednesday. I'm not going to lie, I had never heard of this beautiful leafy green before last week. So, once again, I was on a mission to step outside of my normal repertoire and use my Harvest. I have to admit, I wasn't sure about this one. So, I set out to find a way to use this lovely bunch of tatsoi in a fashion that my preschool aged children would enjoy. 


Tatsoi is an asian salad green. It's leaves are dark green and it's similar to bok choi. It's sort of cabbge-y (yes, I know that is not a word) in flavor so I wanted something with a little bit of sweetness to offset the taste. Tatsoi is rich in vitamins A, C and K as well as beta cerotene. 

Again, my primary goal is to make something that is A) nutritious, B) palatable for my young children, C) South Beach Diet friendly and D) doesn't take all day to prepare. Don't get me wrong, I'm not afraid of a labor intensive recipe, but my current goal with my Harvest2U shipment is to make something that is easy for anyone to prepare. I realize that many of my readers (who are honestly mostly my family and close friends) actually work outside the home and have things higher on their list of priorities than a meal that's going to take them hours to cook at the end of their already busy day. 

Sesame Ginger Chicken with Tatsoi and Noodles

I started off my marinating my chicken in a sesame ginger sauce that I created to be South Beach Diet friendly as well as gluten free (GF).
<sidebar> My lovely husband reminded me that I should be notating which of my recipes are GF since my dear father in law and brother in law are both gluten intolerant. <end sidebar>

1/4c soy sauce (be aware: If you are gluten intolerant, not all soy sauce is GF)
1/4c rice wine vinegar
1T chili oil
1T sesame oil
2t sugar substitue (I used the one in the yellow packet)
1 larve clove garlic, crushed
1/2t fresh grated ginger
1t finely chopped chives (I used garlic chives)
dash of salt and pepper

Whisk above ingredients together and marinate chicken in refrigerator for several hours. 

Chop the following:
2 small carrots (julienne aka matchsticks)
1 small turnip (julienne)
2 small leeks
You can put these together and set aside.

Chop a handful of fresh parsley and about a tablespoon of fresh chives and set those aside as well.

Wash and pat dry your tatsoi with a clean kitchen towel or paper towel.

In a large pot of boiling water, cook up about a half of a box of organic, whole grain thin spaghetti. Remember, I'm adapting this to the South Beach Diet, so if you want to substitute rice noodles it's perfectly fine! Also, for those who are gluten intolerant use GF spaghetti noodles or GF rice noodles. 

In a wok or large pan (I opted for the large pan since I do not own a wok) heat some oil and brown your chicken (but reserve the marinade). Once the chicken is browned, remove it from the pan and set it aside. 


Next, you'll want to deglaze the pan with a little splash of white wine. I used a lovely Sauvignon Blanc because that's what I wanted to drink that night.


Then pour a glass for yourself. *evil grin*

OK, seriously. Once the pan has been deglazed and the majority of the wine has evaporated, add the carrots, turnip and leeks into the pan.

Once the veggies start to soften up a little bit, add in the rest of the marinade to the pan.
Add your beautiful, vibrant green tatsoi to the pan and mix well.


Once it starts to wilt just a little bit, add in the noodles, parsley and chives. Also add the chicken back into the pan/wok. This part goes very quickly. The tatsoi and vegetables going from vibrant and crisp to overcooked and soft in the blink of an eye. So, don't blink....OK? Kidding.

When you're done, dinner should look like this:

When I put it on the plate I topped it with some sesame seeds. It was totally a matter of preference. My boys gobbled this up! I was so incredibly happy to see them devour all of these totally healthy ingredients. 

So there you have it, friends. A totally healthy, fast and delicious dinner that your kids will eat! 

Enjoy!